
| Home | WikiLEC | Repairs | Upgrades | Gallery | Buy & Sell | Mountain Chips | Meets & Events | Contact |
|
Angie's new car......
Moderators: theelanman, dapinky, Specky, clemo, Nige, Sy V, Dave Eds, DaveT, Elanlover, muley, Enright, algirdas, nitroman, GeoffSmith
Re: Angie's new car......
 by Saltire » Tue 04.07.2023, 07:15
1995 Elan S2, BRG - Now sadly sold
Mrs Saltire’s 2021 Mini Countryman Cooper S
Mrs Saltire’s 2022 BMW i3S
-

Saltire - God
- Posts: 2457
- Joined: Sun 05.04.2015, 22:27
- Location: Left foot in Wiltshire, right foot in Gloucestershire, heart in Scotland
Re: Angie's new car......
by Tuga2112 » Tue 04.07.2023, 13:55
dapinky wrote: be aware that the nuts are 'k' nuts so won't be loose enough to undo with your fingers until they are nearly out anyway.
are 'k' nuts the same as nyloc nuts or is this a different type of nut your referring to ?
Youtube Channel @Tuga2112 M100 repair videos
-

Tuga2112 - God
- Posts: 3075
- Joined: Fri 12.09.2014, 22:54
- Location: Durham with a regular trip to Walsall
Re: Angie's new car......
by dapinky » Tue 04.07.2023, 14:15
Tuga2112 wrote:dapinky wrote: be aware that the nuts are 'k' nuts so won't be loose enough to undo with your fingers until they are nearly out anyway.
are 'k' nuts the same as nyloc nuts or is this a different type of nut your referring to ?
'k' nuts are similar in "intention" to a nyloc nut, but has a metal bit not a nylon bit to grip the thread and prevent it shaking loose..... I think they basically get a plain nut and deform it after the thread has been cut, to make it a bit oval.
They are usually intended for high heat situations where nyloc wouldn't work.... and is used in the Elan front suspension on the bolts through the damper yokes and other places.
I can't remember if they are always this type of nut, or just what was on mine - and it isn't shown in the parts list. I suppose it is one of those bolts that you don't want coming undone, so i will use the same type of nuts this afternoon when I fit the new cylinder (They are meant to be 'single-use' but I bought a bagful when I was doing the suspension. I can't see a reason for not using nylocs, but as I have some M8 'k' nuts, it makes sense to use them.
Just the one now, but this one's mine! - and it will be finished eventually..... - but also temporary custodian of a project until it is finished enough for Angie to drive it
...oh, and a 2006 Freelander destined for the jungles of The Gambia - 4500 miles across roads, desert and tracks - what could possibly go wrong?
-

dapinky - LEC Administrator
- Posts: 10621
- Joined: Sun 15.10.2006, 12:54
- Location: As far west as you can get in West Wales before you become Irish (Pembroke Dock).
Re: Angie's new car......
by dapinky » Wed 26.07.2023, 19:20
Bearing in mind that it hasn't moved under it's own power in 8 years, and although I know the engine runs, I had no idea about the clutch and gearbox. So I moved a couple of cars around and drove it out of the garage. Always nice when the clutch allows a gear selection. Before I went to far I tried getting into all 6 gears (5+R) static, and it seemed fine, so out onto the road it went (yes, it is a private road, so no worry about the MOT/VEL situation).
All was well, so I returned to the drive where I noticed that the handbrake came up to the end of it's travel and the car rolled backwards...... that'll need a bit of attention then!
I stuck it on a flat bit and gave it a wash/scrub to get 8 years worth of grime off it - the paintwork is poor, but looks far better with it clean.
During this procedure the NS door mirror fell out (because I removed the gaffer tape surrounding the glass) and someone has clearly had a go at fixing the internal bits using a selection of M6 bolts, metal pins and butyl goo..... it now resides in the bin, and has been replaced with a complete Pacific blue hosing and motor that I had in a crate, and the original glass, cleaned up of all crap. It all works a treat, but I really should have done it when I had the door card off before, it would have saved taking it off again - still, at least it had all new fixings, so came off easily.
Back in the garage I reversed it in to try and set the headlamp aim against the door - this resulted in another removal of the OS pod to fettle the fixings in order to rotate the lamp unit a tad clockwise..... now it appears to be as good as I can guess it to be, and the MOT man can set it properly on his equipment.
The handbrake has been adjusted so it locks up on 3 clicks, but a bit of a pull will engage 4 or 5 with a really good pull - so that should be okay now.
I emptied out the water (with associated algae and crap) from the washer bottle, and then filled it up to flush out the pipework.... once it ran clear I replaced the pipe onto the jets and they all work. The wiper blades disintegrated when I was washing the car, but a new pair arrived in the post today.
I noticed that the fan works on all speeds, but the flaps only allow air through when the engine is running - suggesting a vacuum leak somewhere, as once I turn off the engine, the blowers stop airflow to the cabin.
So, I removed the NS wheelarch liner and took out the vacuum reservoir. It seems to hold a vacuum (by sucking a hose attached to the fitting, and then removing my finger from the other port after stopping sucking. I assume there is something amiss behind the dash, but before I could get that far I decided that it would be easiest to simply replace all the vacuum hoses whilst I was there, so started with the one from the inlet manifold to the vacuum reservoir...... which is where the next mishap occurred.
well, not really a mishap, as there had been an attempt at a "repair" at some time in the past - the small bore plastic spigot from the top of the coolant reservoir snapped off inside the hose - leaving a 10mm piece of pipe still on the tank. A closer examination showed that the area had a bit of glue on it, and the jubilee clip was very tight, but just not enough to do the job properly without a ridge to clamp the pipe against.
As luck would have it, there was a new tank sitting in the same crate that I had the mirror out of, so I dug it out and started to drain the coolant down.
Then I got hit by further 'project creep' - whilst the tank is out, it is a good time to replace the coil packs for the new ones I have bought for the car..... so I may as well change the HT leads as well....... did someone say "spark plugs?" - okay then.
With the coolant level down, it seems daft not to make a start on the Samco hoses that I can get at....... oh, bugger it, may as well drop all the coolant and do them all whilst I'm at it.
Except, to get at the bottom hose, I needed to remove the turbo heat shield and the turbo support bracket - along with the dipstick support bracket - - someone clearly fitted the jubilee clip when all those bits weren't there! So, I may as well clean and paint the brackets and the heat shields........
I had a few swear words at the bottom hose, and it eventually came out - surprisingly, the new one went in far easier than the old one came out - far more flexibility in the silicone ones than the old rubber, I suppose.
I have got about 2/3 of the new hoses in, and will finish them off tomorrow - except for the one heater hose which I can't do yet as the steel hose joiner looks a little past it's best. Why don't Samco include a 16mmx75mm aluminium joiner in the hose set?????? Still, the new one should be here by the weekend.
Then I may get round to seeing how hard it is to get to the vacuum hoses behind the glovebox, which is where it all started.
Oh, then I may be in a position to actually book an MOT and see where that takes me in relation to "next job on the list".
I know that a change of gear oil is on the cards, but until I drive it a bit I don't know if the driveshafts are okay or need some work, and it seems pointless changing the oil if the shafts need to come out afterwards. Dashcam to be fitted, sort out the instrument illumination (oil pressure gauge doesn't light up) and change the dial faces on the grotty boost gauge..... I'm sure there will be plenty of other things to sort out before I worry about the respray - but that won't be getting done this year, so I may fit a new rubber front lip now instead of waiting.
Just the one now, but this one's mine! - and it will be finished eventually..... - but also temporary custodian of a project until it is finished enough for Angie to drive it
...oh, and a 2006 Freelander destined for the jungles of The Gambia - 4500 miles across roads, desert and tracks - what could possibly go wrong?
-
dapinky - LEC Administrator
- Posts: 10621
- Joined: Sun 15.10.2006, 12:54
- Location: As far west as you can get in West Wales before you become Irish (Pembroke Dock).
Re: Angie's new car......
by chrism » Sat 05.08.2023, 11:20
The suspension went on next, and took a bit longer than expected as the GAZ shocks were built up on the bench to the correct (ish!) ride height and when I went to fit them, the top rubber mounting had squished just enough to prevent it passing up through the hole in the chassis leg. No matter how I greased it and tried, it just wouldn't go - I had 3 choices - cut the hole bigger (No!), Trim a bit off the rubber bush (Also No!) or drop the spring platform to take the pressure off the top bush (a bit of a pain to do, but the only 'proper' way to go). It would have been nice if you can get spring compressors on whilst the shock is in situ, but mine are a bit chunky to do that.
Having fitted the shock, tightening down the centre shaft nut is easy, then winding up the base is a bit of a ball-acher with 'C' spanners as there isn't much room to get a good swing, so it's 1/6th turn each time, and it needed 21 full turns.
Then I had a bit of an epiphany (having knackered myself out doing the off-side one the hard way)... with the 3 top mounting bolts done up to prevent the shock moving, and before attaching the 2 halves of the lower yoke, it is actually quite simple to just rotate the whole shock body, keeping the platform stationary (actually, the spring pressure holds it, so you don't need to wedge a 'C' spanner in there anywhere). It can be done by hand, but sticking a screwdriver through the hole where the yoke attaches gives far better leverage as it gets tighter the more the spring is compressed. Doing it that way took about 3 minutes instead of the 30 minutes doing it the 'hard' way, and was far less physically tiring.
Avidly following your thread dapinky. Especially noting for your solutions and lovin' 'em
 .
After buying, and prevaricating for well over 6months, I fitted my new GAZ dampers + GAZ springs yesterday. I'd already built them into 'coil-overs' using previously-removed spare front susp top mounts.
Since I could lay them both side-by-side I 'guesstimated' the platform height setting by comparison with the old unit:-
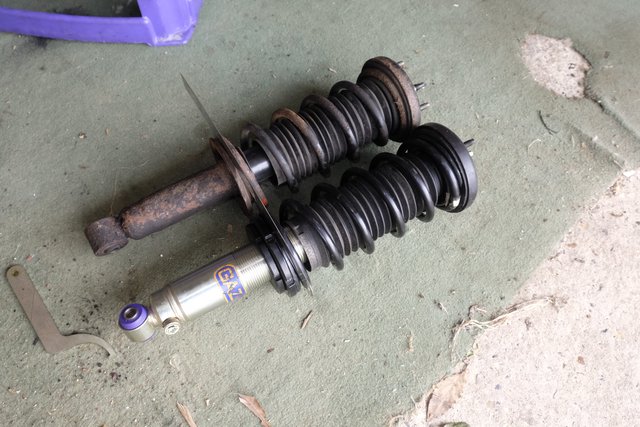
It didn't seem a bad idea at the time 'cos they were physically very similar. Thankfully I didn't have your squish problems, but when jacked down again the rear end is far too high

So, teasing out your epiphany I presume you'd advise me jack up again, undo the bottom damper and arb nuts, depress the link, loosen the damper platform gubbins, then screw both damper + gubbins downwards as many times (jacking down to measure) as it takes until it all measures up correctly (and looks less like a Tonka toy
 ?), then finally lock the platform? (In order to avoid frustratingly tiny platform c-spanner windings in a very cramped space?)
TIA for any further advice please...
(Oh...how I wish we could buy easy, no-need-to-set-up units that would be a doddle to fit! Why on Earth can't we buy (presumably cheaper) 'standard' coil-overs like I did with my previous MGTF135...? Why are our m100s so 'needy'?
 And oh... to have a proper car lift or pit...)
-
chrism - God
- Posts: 916
- Joined: Sun 16.01.2022, 14:36
- Location: West Sussex, UK
Re: Angie's new car......
by dapinky » Sat 05.08.2023, 13:10
I find that winding shocks down with a 'C' spanner is far easier than winding them up! Firstly, you are releasing pressure on the spring, not increasing it, and secondly, the weight of the car doesn't have to be lifted.
For the 'final' setting of ride height I tend to do it on the ground if possible as it is the only way to measure it at the same time as adjust it..... this is far easier with a lift or pit (says me who has never had the advantage of either whilst doing the set-ups).
There can be a fair bit of trial and error when measuring and then dropping shocks, as a 1" drop of the spring platform doesn't necessarily equate to a 1" drop in the car, due to angles involved.... Still, I have all this to look forward to this afternoon (unless I can find enough other 'snagging' jobs to do so I can put it off until tomorrow.)
Just the one now, but this one's mine! - and it will be finished eventually..... - but also temporary custodian of a project until it is finished enough for Angie to drive it
...oh, and a 2006 Freelander destined for the jungles of The Gambia - 4500 miles across roads, desert and tracks - what could possibly go wrong?
-
dapinky - LEC Administrator
- Posts: 10621
- Joined: Sun 15.10.2006, 12:54
- Location: As far west as you can get in West Wales before you become Irish (Pembroke Dock).
Re: Angie's new car......
by chrism » Sat 05.08.2023, 14:12
Yep, on reflection reversing up and down a pair of car ramps under the rear wheels might the way to go since repeated jacking and taking the wheel off could be a bit of a pain. Dunno if I want to jack it high enough to lie (or stick legs) underneath, even with a second support...
Point taken, tho', about over-guesstimating the start height so as to adjust downwards and away from the spring pressure.
(AND, I presume, it's only done after both are dusted - doing the other side after adjusting one might well have an impact on the final settled level.)
-
chrism - God
- Posts: 916
- Joined: Sun 16.01.2022, 14:36
- Location: West Sussex, UK
Re: Angie's new car......
by dapinky » Sat 05.08.2023, 19:06
Not sure if you'll read this before you do the job, but on the off chance that you do, I can tell you how mine worked out this afternoon.....
I had previously "guestimated" the platform positions based on the old units which came off (pretty much like your pictures), and having let the suspension settle for a while decided to actually set it correctly.
I have a couple of pieces of 2"x1" timber which are 160mm and 170mm long, and use these to set the clearance. Firstly, check that all 4 tyres are set to 27psi.
The front shocks ones were pretty much spot on already, the NS needed half a turn of the platform upwards to get it exact, and the OS was left alone.
At the rear it is a bit more of a 'guesswork' situation, as the unladen (curb) condition of the car specifies no occupants, but a full tank of fuel to set the height. I have a nearly empty tank, but work on the assumption that 10 gallons of water weighs 100Lbs, so a tank of petrol will be about 100Lbs!...... so I put 40Kg of weight above the tank position in the hood stowage area, and decided it would be close enough.
When i got under the car it was a good 15-20mm high at the chassis cross member on both sides, but was fairly even. It was far too difficult to lean under the car and reach up into the wheelarch to get to the adjustment (I could reach, but not get a decent swing on the 'C' spanner), so called it quits and jacked up the NS to get the wheel off. I know it causes the suspension to 'stretch' a bit, but it was the only way to get at it.
I lowered the spring platform 6 turns, replaced the wheel with 2 bolts, dropped it down, bounced the corner and found that it had only dropped 5mm at the chassis....
....so repeated it and lowered it another 10 turns, and repeated the measurements..... it was now about 1mm too low.
Decided to do the OS before touching the NS again, and dropped it 15 turns, replaced the wheel, bounced the back end a fair bit and measured it again. The block of wood was a tight fit on both sides, so I raised the platforms 2 turns each side and locked the rings off.
It was interesting to note that when I tried to turn the platforms with the weight of the car on them it was not possible with the space available, as they were tight..... but once the weight of the car was off them, it was possible to drop them with hand pressure, and no 'C' spanner needed until I locked up the rings at the end.
I am happy that it is pretty close, without weighing the corners, and will be re-checked at some time in the future,
Just the one now, but this one's mine! - and it will be finished eventually..... - but also temporary custodian of a project until it is finished enough for Angie to drive it
...oh, and a 2006 Freelander destined for the jungles of The Gambia - 4500 miles across roads, desert and tracks - what could possibly go wrong?
-
dapinky - LEC Administrator
- Posts: 10621
- Joined: Sun 15.10.2006, 12:54
- Location: As far west as you can get in West Wales before you become Irish (Pembroke Dock).
Re: Angie's new car......
by Tuga2112 » Sat 05.08.2023, 22:14
Do you have any pictures of the before and after of what your springs look like ? and what did you use to clear out the rust ? just ph down or something before the phdown ?
Ive not gone to the effort of installing the struts i bought at the same time you did yet.. loads of other issues appeared in other cars in the meanwhile.
most recent one was 2 seized caliper pistons on a toyota 4runner that is 29 years old... with 4 pot calipers those buggers broke a piston spreader tool as well as a very strong C clamp. I finally got an 1/8bst to M10 1.0 adapter and pluggged the grease gun to the caliper and .. oh boy how scared i was of breaking that grease gun untill the moment the leftover compressed air (plus brake fluid pressur) popped the piston with a bang that make me think the grease gun had failed internally.
im sure it will be good content but a afternoon job of changing brake pads became a 3 week task of doing a full refurbishment of the calipers instead
Youtube Channel @Tuga2112 M100 repair videos
-
Tuga2112 - God
- Posts: 3075
- Joined: Fri 12.09.2014, 22:54
- Location: Durham with a regular trip to Walsall
Re: Angie's new car......
by chrism » Sat 05.08.2023, 23:47
Rain stopped play today and your specific experiences and details will make my efforts so much easier if/when I'm able to resume tomorrow...

-
chrism - God
- Posts: 916
- Joined: Sun 16.01.2022, 14:36
- Location: West Sussex, UK
Re: Angie's new car......
by dapinky » Sun 06.08.2023, 11:05
I don't tend to take many pictures as I go along, unless it is to try to demonstrate a process that I think may help other people. The only image I have of the spring is on the picture of the rear suspension which I posted in this thread on 30th June. I didn't take one of it in a 'before' condition...... it was just a rusty, slightly flakey in places, spring!
In fairness, this car was in far better shape than any other 30+ year old elan I have worked on, and actually far better than my blue one was at 15 years, so the springs still had parts of the OE paint and the yellow/green markings on them (in small places).
I cleaned them up with a wire brush to remove as much paint and crusty metal as I could, then soaked them in Phosphoric acid, washed them off and painted them. I did a 2-stage paint process, with a first coat of Davids 182 Zinc primer, and a top coat of satin black chassis paint.
Just the one now, but this one's mine! - and it will be finished eventually..... - but also temporary custodian of a project until it is finished enough for Angie to drive it
...oh, and a 2006 Freelander destined for the jungles of The Gambia - 4500 miles across roads, desert and tracks - what could possibly go wrong?
-
dapinky - LEC Administrator
- Posts: 10621
- Joined: Sun 15.10.2006, 12:54
- Location: As far west as you can get in West Wales before you become Irish (Pembroke Dock).
Re: Angie's new car......
by chrism » Sun 06.08.2023, 13:36

I was able to adjust them with the wheels in place, jacking the high enough and reaching upwards.
Jacked up, adjusted then lowered, checked, jacked up, adjusted, lowered, checked etc etc...Most of the adjustments were done by hand using the c-spanners supplied by GAZ to finally tighten the base and collar.
The 160mm height was by locking tape measure which was able to stand vertical, rather than 2 x 1 wooden measure.
5-6 clicks of the damper valve at the bottom was recommended so I started with posn 5 and might try posn 6 cos I sometimes felt I experienced a little rear 'bounce' - but it's bound to feel different after such drastic surgery so I'll wait a bit. I'm presuming that clicking further stiffens up the damper(?)
On reflection, it's easy once someone's offered detailed advice - thanks again dapinky.
-
chrism - God
- Posts: 916
- Joined: Sun 16.01.2022, 14:36
- Location: West Sussex, UK
Re: Angie's new car......
by dapinky » Fri 11.08.2023, 12:29
..... so it is always nice to get a new ticket with no advisories.

However, all is not quite as well as I had hoped, with the car driving like the wheels are a bit square. I have yet to investigate, but it feels like one is either out of balance, or buckled/deformed in some way. I have given them a good clean over the past few months, and didn't notice any obvious defects, but I am also aware that the tyres have been sat in one position for 7 years before I got it home, and had lost some (in one case, all) of their air during that time. As the tyres have loads of tread, and have held good air pressure since January, I felt that they were ideal for use whilst rolling it around in the garage, and will be replaced for general use before Angie takes delivery of it. MOT didn't show up any obvious defects in a tyre, so I shall be swapping them for the ones on my car and see how it feels. If they don't improve things, then I shall have to investigate further, but hopefully it'll just be a wheel or tyre (I have a spare set of 15" wheels with tyres in the garage and will use them if needed (although they are not as shiny as the ones on the car)..... it may get looked at today, or it may not! Anyway, I'm pleased that I don't have a list of remedial work to address, and the emissions were low for an SE (running closed loop Everest), brakes were all excellent (Hi-Spec front, standard (new) callipers at the back, new Master Cylinder, new pipes/hoses throughout and adjustable proportioning valves).
On the way home I even let it idle to get the fans to kick in, which they did, and am pleased to note that the A/C works - albeit not freezing cold, but a bit cooler than the ambient air, so that tells me that the system appears to be intact, working and just in need of a re-gas.
Overall, a good day
Just the one now, but this one's mine! - and it will be finished eventually..... - but also temporary custodian of a project until it is finished enough for Angie to drive it
...oh, and a 2006 Freelander destined for the jungles of The Gambia - 4500 miles across roads, desert and tracks - what could possibly go wrong?
-
dapinky - LEC Administrator
- Posts: 10621
- Joined: Sun 15.10.2006, 12:54
- Location: As far west as you can get in West Wales before you become Irish (Pembroke Dock).
Re: Angie's new car......
by TorqueHorse » Fri 11.08.2023, 22:25
 )
Its been great reading along on the progress. Hope the wheel issue sorts itself out easily.
'91 FED M100 -rolling resto
...and come to Salt Lake City, for the very first truly national Lotus Car Club event for the USA: LUG September 24-28, 2026
-

TorqueHorse - Fanatic
- Posts: 731
- Joined: Wed 01.01.2020, 07:42
- Location: Austin, TX
Re: Angie's new car......
by FerdinandKola » Thu 17.08.2023, 14:25
- FerdinandKola
- Welcome to LEC - please introduce yourself
- Posts: 1
- Joined: Thu 17.08.2023, 13:42
Re: Angie's new car......
by dapinky » Tue 22.08.2023, 19:30
The most important issue is the wheel issue - which actually isn't a wheel issue, so much as a hub issue...I tried the wheels off my own car and it was identical, so i adjusted the bearings a bit and it made some difference, but nowhere near correct.
... as "good fortune" would have it, there was a post on Facebook by John Whelton who had fitted a brand new pair of rear hubs, and found that they were not running true. He posted some videos to show how much run-out there was, and it looked quite substantial. Whilst he didn't "name & shame" the supplier as it is an ongoing negotiation, he was quite happy to provide me the details privately.
Suffice to say, mine came from the same supplier, and I'm pretty sure that whoever the supplier had been, they would have the same potential issue, as all of the retailers listed the same items at the same price at the same time, following years of 'drought', so it is a fair guess that they all come from the same manufacturer.
Like John, I then set about measuring mine, but my dial gauge was broken, so I had to wait for a new one to arrive (next day, thank to ebay!!).
So, I measured the ROS and found it had about 0.15mm run-out... and it didn't matter if the bearings were let out a tad, or tightened up to needing a pull to rotate the hub, but no chance of 'freewheeling' - all readings were pretty similar.
With nowt to compare that to, I dug out the old hub, cleaned off the outer face with a flap wheel in an angle grinder, stuck it on the hub and (even with a fairly rough surface, and old bearings) it had a run-out of less than 0.05mm....not too much different than the new one, but it clearly is more on the new one, especially if you consider that the disc face is dead smooth on the new one.
Okay, so looked at the NS one, and first measurement showed it to be 0.80mm out! - now that is pretty significant in my book! Again, with bearings loose, normal and tight it was the same.
I put the disc that had been on the OS on and it was still 0.15mm out of true, so dug out the other old disc (which is pretty knackered to look at, with one bolt-hole useless as it has been drilled and tapped to M14!!!) Anyway, with the face cleaned up I was amazed to find that the run-out was less than 0.02mm - so better than the "good" old disc, and far, far better than the new ones.
I kept that one on for now, but wouldn't be doing a long drive with it.
Anyway, a quick phone call to the supplier, and was told that there have been a few issues with these items, and they have removed their stock from sale for now. It will be sorted out with a new pair when they get some accurate ones in.... this could be about a month or more
In the meantime, I would urge anyone who has bought a rear hub (or two) since Christmas 2022 to get an accurate check of the disc face, and if it is more than 0.05mm out of true, see if it is one of the 'defective' batch, and get hold of whoever supplied it to you.
Okay, it is annoying, but it isn't really going to make a big difference to my planned use of the car - it could be so much more devastating if it was needed for a Grand Tour of Europe or a daily commute.
I shall not be naming the supplier, because clearly it is a fault of their supplier - and they are addressing the matter as best as they can.... so no problem with them at this stage.
Obviously, I have been considering the way forward, and have been in contact with Ron about the Astra Hubs...... I am prepared to give the company a chance to sort out the duff parts (machined by Stevie Wonder using a cubit as a measurement device when setting up the lathe), but if they can't get me a suitable pair in a reasonable timescale, I shall be looking for a different resolution, which will involve Astra Hubs!
As for 'other news' - well, I've made a new radiator undertray as there wasn't one on the car (just used the one off my car as a mold, and a couple of layers of mat with resin, then shape the fluted edge, drill the holes and bobs yer uncle.
I'd forgotten how restricted the rearmost seat position is with Elan seats & steering wheel (I've had an Elise steering wheel for 16 years, and S2000 seats for 8 years)... so now the seat is fixed 70mm further back (there is enough room behind the drivers seat to allow for this, and possibly more)..... the distance was decided by the pure fact that I got a 50mm x 6mm Stainless steel bar which was 1m long, chopped it in half and drilled holes to line up with the OE seat fixings..... fitted them and worked out that if I drilled holes 70mm back from the current holes, it would be fine...... so that's what I did.
The only issue is that I didn't have enough M10x30mm stainless washers to fit them, so am waiting for some more to arrive. Clearly, with a 6mm raise in seat height, the spacers needed to be thrown out and replaced with a pack of washers 6mm thinner..... but then dropped another 3 washers to allow for the thickness of the bolt-head above the bar which would fowl the runner if the runner isn't spaced 6mm higher than the bar..... Anyway, simple enough to do, but drilling 8 10mm holes in stainless steel bar 6mm thick is a bit time consuming (not to mention allowing the drill bits to cool down and keep spraying it with WD-40).
Also I now have a reversing camera and a dash cam fitted, with a screen where the ashtray was.....
New rubber lip will be fitted this week when I do the undertray, the old one took some doing to remove the fittings, but all done now.
Just the one now, but this one's mine! - and it will be finished eventually..... - but also temporary custodian of a project until it is finished enough for Angie to drive it
...oh, and a 2006 Freelander destined for the jungles of The Gambia - 4500 miles across roads, desert and tracks - what could possibly go wrong?
-
dapinky - LEC Administrator
- Posts: 10621
- Joined: Sun 15.10.2006, 12:54
- Location: As far west as you can get in West Wales before you become Irish (Pembroke Dock).
Re: Angie's new car......
by M100TURBOFR » Sat 26.08.2023, 08:30
My A/C will also need regassing soon. What gas will you be using? Saw on a FB group page comment about just popping in RS24.
However, spoke to a local garage and was told that several A/C components would require changing to meet today's standards. Would appreciate answer.
Thanks David
-

M100TURBOFR - Fanatic
- Posts: 340
- Joined: Tue 16.01.2018, 15:19
- Location: Oise - France (60800)
Re: Angie's new car......
by dapinky » Sat 26.08.2023, 09:31
Having absolutely no idea about AC stuff (apart from knowing that R12 was stopped many years ago) I set about expanding my understanding.
When i got the car I was told that the AC unit had been 'upgraded' previously with a new compressor, and had been adapted for R134 at that time.... so I knew I was looking for R134.
It soon became apparent that that stuff is also "yesterdays gas", and can only be purchased by licensed people in 12Kg cans (unless you buy from China, then you can get it without a license).
I understand that R134 became R134a somewhere along the line - but it seems pretty similar (and is interchangeable in use) - again, not easy to get hold of.
R1234yf is the current AC gas - but it doesn't mix with R143a (or it might do, or it is hard to use, or there is some reason you shouldn't mix it, or there is something else to confuse me on the internet) - either way, it seems that it is an expensive way to go (have the 'old' gas recovered by a licensed person, then get bits of the system changed, then get it re-gassed with R1234yf) so decided on a cheaper way to try it.
I bought some gas which is marketed as R134a 'top-up', and will be trying it out. I can't see what it actually is (chemically), but it comes in a 185g can which it claims to be the equivalent of 500g of R134a.
As the M100 has a capacity of 28oz of R12 (as new), that should be about 800g - I believe that R12 and R134a use the same weight, but I could be wrong...... I also understand that the whole system can be pressurised to about 30psi max (low side) before invoking a leak from somewhere.....
....so.....
I bought 2 cans of 'magic gas' which will give me the equivalent of 1Kg of R134a, and a pressure gauge/pipe/connector thing to add it.
Hopefully, it should just connect together, squirt stuff in until the pressure is right, then all work fine!!!!
(If not, then I shall just ignore the fact that I have AC in the car until it gets worried about - never had it before, don't really need it now).
https://www.ebay.co.uk/itm/305038329274
It came from Germany, so you getting it in France shouldn't be a problem....... I don't know when I'm even going to try it though, and it may well not be until next year, so please don't rely on me for a long-term review!
Just the one now, but this one's mine! - and it will be finished eventually..... - but also temporary custodian of a project until it is finished enough for Angie to drive it
...oh, and a 2006 Freelander destined for the jungles of The Gambia - 4500 miles across roads, desert and tracks - what could possibly go wrong?
-
dapinky - LEC Administrator
- Posts: 10621
- Joined: Sun 15.10.2006, 12:54
- Location: As far west as you can get in West Wales before you become Irish (Pembroke Dock).
Re: Angie's new car......
by M100TURBOFR » Sun 27.08.2023, 09:44
David
-
M100TURBOFR - Fanatic
- Posts: 340
- Joined: Tue 16.01.2018, 15:19
- Location: Oise - France (60800)
Re: Angie's new car......
by dapinky » Sun 27.08.2023, 11:32
Anyway, it is only a short update to show my latest effort to save money - a radiator undertray! There wasn't one on the car when I got it, and a new one would set me back £50 or so. I don't think I've ever seen one for sale second hand, so the obvious answer was to make one.
As it is basically just a (nearly) flat sheet with a lip and a serrated edge I decided that it could be made by simply using the one off my own car as a mold, and not making a separate mold from it in the reverse image.
I didn't have any mold release agent/wax so gave it spray of silicone spray hoping it would work, and mixed up 400g of resin. This was the right quantity to do a layer of 600gsm mat and wet it down properly. 20 minutes later it was time for a second layer, which only needed 250g of resin.
I normally like to remove fibreglass from its mold before it fully hardens as it can be far easier to trim the outside edge with shears, but this wasn't going to let go and to force it would have risked spoiling the shape..... so much for the silicone spray!
Next day it was a case of separating the new from the old, and employed a marvellous method of using a wallpaper scraper between the layers, which had the effect of pulling the layers apart by removing the paint from my old tray with the new fibreglass.
It actually worked really well this way, as it imprinted the exact shape that the edges needed cutting to (but it was a bit of a worry that it wasn't going to separate without damage).
As it had now fully hardened it needed to be trimmed with a thin disc in the angle grinder, and a sanding flapwheel to get the exact shape and to remove a couple of rough bits on the faces.
I could have called it a day, but I wanted it finished off as good as possible, so painted the raw edges with some more resin and brushed a thin coat over the whole top face to smooth it out.
A coat of paint for both of them gave me a final result that I was happy with.......
So, was it worth it? - well, I needed one, it doesn't really matter what it looks like as it will only ever get seen by the MOT tester or anyone who is specifically looking (unless the car is upside down, and then it's cosmetics are unimportant!) - it was a simple part to make as I had another to use as a mold..... put it this way, it cost me nowt (okay, there is value in the materials which I already had, but if not would have had to be bought - so 1kg of resin and a metre or so of mat would cost about £15), but it isn't a quick process as a 1-off.
If I were to make a batch of them, then making a proper mold and turning them out after an hour would be the way to go.... and materials are cheaper in bulk anyway.
Overall, it does the job that is needed, wasn't a difficult thing to make, and could even be done without a part to use as a template (as it is flexible enough to be made flat and bent when fitted - as long as there is a bit of a lip to fit under the bumper) - nah, scrap that thought, doing it without a template means you have nothing to compare it to, and it would be a real faff to get the leading (fluted) edge right......
So, as a one-off it wasn't bad (time costs me nowt and I had the materials), but if I was short of time, and had to buy the materials, then a reproduction from SJs for £50 is pretty good value really, by the time you consider their costs to produce the item (materials and time) it isn't bad at all. (It's easy to complain at fifty quid for a bit of straightforward glassfibre, but I would never get rich my making them commercially!).
In other news I can now get into the car and get a comfortable driving position as the seat is further back on it's new mountings. As with many such things, it took a lot longer than the finished result looks like it would have taken - but it is solid, practical and comfortable.... and my knees have loads of room, so it's worth it (for a car which isn't even mine!).
Progress on the rear hubs is slow, and somewhat out of my hands - but an option is progressing
(and if it all works, then it is many thanks to Ron R for doing the donkey work and making himself available to bounce my thoughts off as I go a similar route.)Just the one now, but this one's mine! - and it will be finished eventually..... - but also temporary custodian of a project until it is finished enough for Angie to drive it
...oh, and a 2006 Freelander destined for the jungles of The Gambia - 4500 miles across roads, desert and tracks - what could possibly go wrong?
-
dapinky - LEC Administrator
- Posts: 10621
- Joined: Sun 15.10.2006, 12:54
- Location: As far west as you can get in West Wales before you become Irish (Pembroke Dock).
Return to Projects - Car (Major)
Who is online
Users browsing this forum: No registered users and 2 guests