Page 1 of 2
Nigel (soon to be The Stig)

Posted:
Sun 06.07.2008, 18:27by tweetdriver63
Well, I probably should have done this a long time ago, but I just never got 'round to it. Somebody asked me for pics of my car, so I figured this would be a good time to start my own worthless project thread.
I'm just going to put up some pics and summarize what I've done so far, rather than try to get into a ton of detail.
Done so far:
AB shift cable upgrade
Sound system:
..........Alpine iDA-x001 head unit
..........8" BASS sub in hood stowage bay
..........200W sub amp (behind pass seat)
..........5 1/4" Clarion 2-way component speakers (front)
..........5 1/4" Clarion 2-way coaxial speakers (rear)
..........400W Boss CX-350 4-channel amp (in boot)
Under the hood:
..........Headlight motors, 1 re-built, 1 new
..........Cam cover (Isuzu removed, gloss black, metallic red sparkplug cover)
..........Red billet aluminum oil filler cap w/Lotus logo
..........Intake hoses, rubber-coated in red
..........Oil dipstick handle rubber coated red
..........New thermostat
..........Low-temp fan switch (Dickman)
..........New timing belt and drive belts
Exterior:
..........Red accents on wheels
..........Lotus logo decals and Colin Chapman signature decal
..........Union Jack decals
..........Clear rear turn signal lenses
..........LEC Fast Cat windshield sticker
..........Custom shower cape (DIY)
Brakes:
..........EBC drilled/slotted rotors (front)
..........Wagner Thermoquiet pads all around
..........SS lines all around
Interior:
..........A/C and hazard switch moved
..........Digital clock replaces blank switches
..........Faux CF trim on dash
..........Red-stitched shift knob, lowered
..........CF handbrake handle
..........Momo pedals
New A/C blower motor
Waiting to be installed:
..........New A-Post seals
..........Cruise control
..........SS rear wishbones (I hope)
..........CF escutcheons (planned)
..........Re-trim seats (black w/red alcantara centers planned)
..........Replace current MBC and Superchip with Mountain Chip
..........BOV
Now here are some pics:
Posted:
Wed 09.07.2008, 07:14by Paul.P
Nice car Chris, with some unusual touches

Posted:
Wed 09.07.2008, 15:44by tweetdriver63
Paul.P wrote:Nice car Chris, with some
unusual touches
Thanks. That's exactly what I like. Unusual. One of the big attractions to the Elan for me was how rare they are. It bothers me if somebody else has a car just like mine in my town. I doubt there's another one in this whole backward state! Another attraction was the potential for me to tinker with it. I specially like to do that with the appearance. I don't really get into doing the mechanical stuff that much, although with this car, there isn't really that much choice in the matter.
Posted:
Sat 12.07.2008, 18:21by tweetdriver63
It doesn't show in the picture above, but the faux CF trim around the funboy3 guages doesn't want to stick properly. The combination of the thin film, the surface it's stuck to, and (I think) heat, causes it to curl at the edges, and it's also gotten some bubbles in it. I've been working on a fix this morning. I've decided to cut a then, semi-rigid plastic backing for the CF stuff, then glue it to the fascia with trim adhesive.
Here are some pics of the work in progress:
Because the plastic surface is slick, I sprayed it with primer to make sure the CF film holds well.
I've cut some extra templates. At first, I was just going to cut one or two extras in case I screwed up, but I went ahead and cut as many as I had material for, so I have four extras. If anybody wants one, I'll be happy to send it to you for postage cost. If you want it with the CF film to go on it, I'll add a couple of bucks to it to cover the cost. I'm not going to cut the individual holes, so I can't be blamed if they don't line up exactly. They all have the holes marked, based on a standard fed car, so you can check first before cutting them to be sure it'll all line up.
Posted:
Sat 12.07.2008, 18:41by tweetdriver63
Installed and trimmed out.
Posted:
Sat 26.07.2008, 03:02by tweetdriver63
On the way:
Turbo XS BOV
CF escutcheons
--thanks Blair
Napa Black leather/Black Alcantara seat covers
--thanks Micheal
I'm also planning to do the door cards and center armrest cover with Alcantara after I get the seats finished.
Anbody have opinions on the following colors? I like the Mitsubishi color, and I'm hoping I can come up with the dinero to make it happen.
Posted:
Sun 27.07.2008, 16:26by Doug
the mitsu color is nice -- I see an eclipse in it regularly and recall how the color is a nice one.
go for it!
A little Problem
Posted:
Tue 29.07.2008, 05:48by tweetdriver63
Since my BOV and escutcheons didn't show up yet, I decided, instead, to try installing one of my new A-post seals this past weekend.
The job isn't all that hard. I chose to re-use the carriers, and not to remove them at all. That way, I wouldn't have to deal with re-installing them and sealing all that up. If it ain't broke, don't fix it, right?
Anyway, the only semi-difficult part of the whole job was getting the carrier cleaned out. A flat screwdriver can be used to scrape all the old sikaflex off the flat part, but in the channels on the sides is a little tricky. I used a paint-can opener tool, like in the picture, and with its small, curved tip, it worked beautifully. (Note to the Wiki gods)
Well, along with installing the new driver's side seal, I thought it would be a good time to do a little patching on the intermediate seals. They weren't real bad, but there were places where the skin surface was getting a little rough, so I figured I could put a little sikaflex on them, and smooth it out with a latex-gloved finger. I just wanted to get a good smooth, thin coat over the rough areas.
The problem is that I over-looked a spot on the forward intermediate seal on the driver's side, and didn't smooth it out, so I discovered, after it was cured, that I have a blob of it, right in the groove where the windows fits, and it's causing a gap on both sides of it. I need some advice on how to remove that mound of sikaflex without damaging the seal underneath it.
Please. Any help is appreciated.
Posted:
Sun 03.08.2008, 03:04by tweetdriver63
Working today on installing my TurboXS BOV.
First, I've figured to plumb it directly into the stock intake pipe. I found a connector, which is actually for attaching PVC conduit to a outlet/switch box, but it has all the necessary qualities. (see pic)
I cut a hole in the intake pipe exactly the size of the adapter, then managed to get the nut behind it and tighten it very tight. It won't be going anywhere.
Next I've glued the aluminum adapter pipe that came with the BOV to the PVC adapter using a generous amount of JB Weld.
So far, road tests are positive.
Posted:
Tue 05.08.2008, 21:50by Elanlover
I would check your BOV connection frequently. That last thing you want is for some little piece to come loose and get sucked into the engine!
Posted:
Tue 05.08.2008, 22:17by tweetdriver63
Elanlover wrote:I would check your BOV connection frequently. That last thing you want is for some little piece to come loose and get sucked into the engine!
I will regularly check to make sure nothing's working loose, but the only thing that could would be the locknut on the inside of the intake pipe, and it would take a lot for that to happen I think. I tightened it down to where it's really squeezing the rubber of the intake pipe, so there's a ton of friction. Even with a wrench, I couldn't loosen it by hand when I first attached it.
Next problem: the brake tell-tale lit up during a stop a last week, so I checked the fluid, and it was a bit low. I thought it might just be that since I replaced all the lines with SS ones about a month ago, all the tiny bubbles had been working their way out of the lines and up to the reservoir. I topped off the fluid, and it was fine for a while, but yesterday the light came on again. It's just been 5 days since the last top-off, and it was down again. I have a leak.
I'm hoping it's from one of the bleed nipples, or one of the new lines not being quite tight enough, since the work was so recent. It seems like a big coincidence if it's something more serious.
Keeping my fingers crossed, and my fluid topped off.
Posted:
Mon 11.08.2008, 00:29by tweetdriver63
Next job:
Re: Nigel (soon to be The Stig) - Poll Closed - Thanks
Posted:
Fri 10.10.2008, 04:36by tweetdriver63
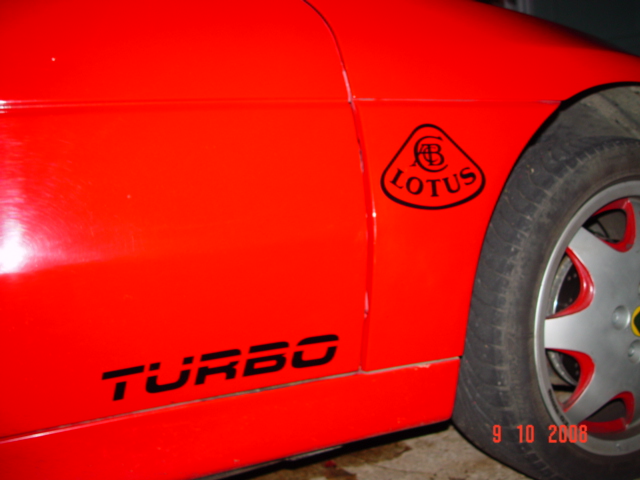
I'm always messing with the outside, aren't I?
- DSC03252.JPG (140.18 KiB) Viewed 7711 times
I wanted to note the turbo somewhere on the outside, and I thought doing it ala 80's Esprit (you know, the "turbo esprit" thing on the sides, just ahead of the rear wheel arches) would be good, but I couldn't find a way to do it using the same fonts/etc.
Re: Nigel (soon to be The Stig) - Poll Closed - Thanks
Posted:
Tue 03.02.2009, 01:39by tweetdriver63
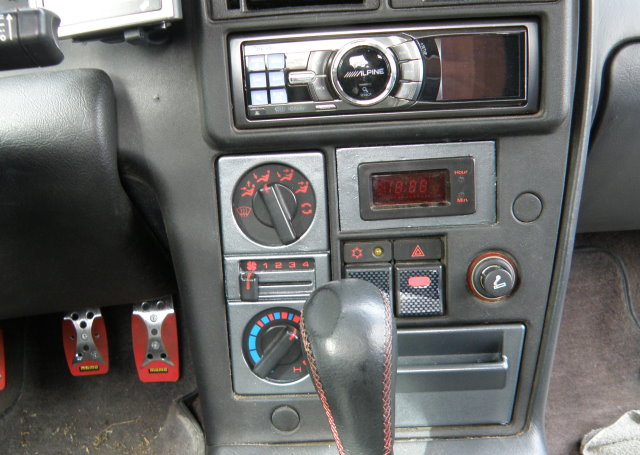
I'll post pics when I get some daylight ones. I decided to get away from the fake carbon-fibre accents I had used on my dash. I didn't like the fact that everything on the center dash is a different shade of black/dark grey (ashtray, switches, etc), so I chose the self-adhesive fake CF stuff as an easy and inexpensive way to make it more uniform, and I thought it looked decent. One problem is that it starts to peel up at the corners after a while, the other is that, now that I have real CF escutcheons, the fake stuff is too obviously fake.
My solution: paint.
I have my TomTom mounted to the dash, where the digital clock used to be, and permanent wiring there, so I figured what would look best would be to try to match (or come close) the finish on the TT, which is kind of a brushed aluminum. I bought several cans of spray paints that looked similar, then experimented on primed wood to see how they matched up. Ultimately, I decided I liked the gun metal paint that I actually bought to refinish my factory 16" wheels. So far, I've finished the trim on the A/C controls, the ashtray, and around the digital clock (which I have mounted in the space where there were originally three switch blanks). It is subtle, and looks fantastic. I tried it on one of the trim pieces I made for around the FB3 guages, but the finish doesn't work well on that material, so next weekend I'm going to remove the FB3's and the HL switch and panel light rheostat, and paint it directly onto the facia. I'm also going to pull the speedo cluster back out and do the front trim (the black face between all the guages/tell-tales), as well as pop the A/C and hazard switches out and do them.
Re: Nigel (soon to be The Stig) - Poll Closed - Thanks
Posted:
Tue 03.02.2009, 03:47by lotos
I'm anxious to see the pics. Great project so far.
Re: Nigel (soon to be The Stig) - Poll Closed - Thanks
Posted:
Tue 03.02.2009, 18:01by tweetdriver63
Here's a pic of what I've done so far. As is usually the case, it looks better in person.
- gunmetaltrim1.jpg (86.25 KiB) Viewed 7470 times
The picture is without flash. With flash you can see that there's a shine to the paint that doesn't really show in this picture.
You can also see by the A/C and hazard switches, how much better/cleaner it looks, compared to the fake CF.
It coordinates with the finish on the TomTom and the Alpine head unit very well, don't you agree?
Re: Nigel (soon to be The Stig)
Posted:
Sat 07.02.2009, 08:41by tweetdriver63
Nice day. Top down. Here's a better pic.
I still haven't done the AC/hazard switches or the instrument cluster, and what you see in the pic around the FB3 gauges, is the trim piece I painted. I'm going to take that off and paint the facia directly, because the trim piece won't hold a smooth finish.
Re: Nigel (soon to be The Stig)
Posted:
Sat 07.02.2009, 23:32by tweetdriver63
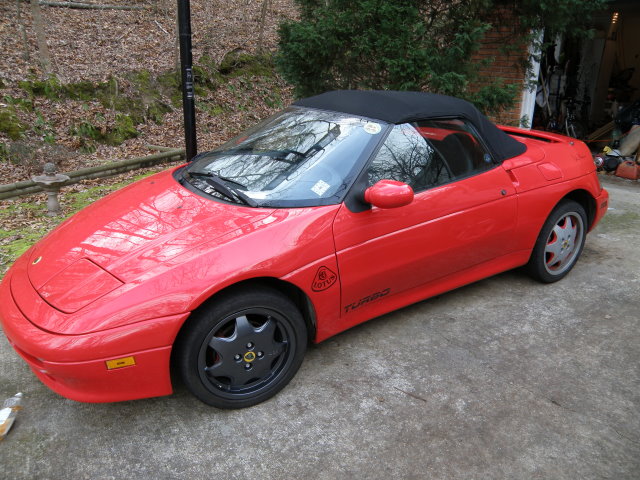
I've started the wheel refinishing. I've done the two on the right-hand side, and I'm doing the other two tomorrow. Here's the first one, back on the car.
It's amazing what a difference this makes. I look at the car on the driver's side, with the old look, then on the pax side, and it's a completely different car, with a completely different personality. I'm quite pleased with the look.
Re: Nigel (soon to be The Stig)
Posted:
Sun 08.02.2009, 23:51by tweetdriver63
This picture shows the personality transformation quite clearly.
- gun metal wheel comparison.jpg (114.91 KiB) Viewed 7341 times
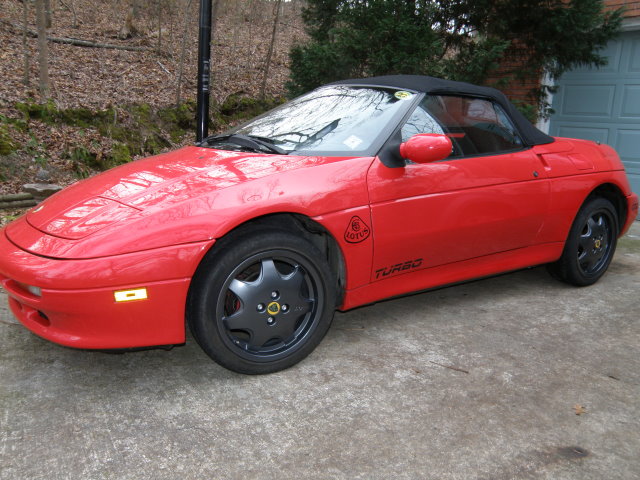
Here's a couple more. All done now.
- gun metal wheels 1.jpg (106.12 KiB) Viewed 7336 times
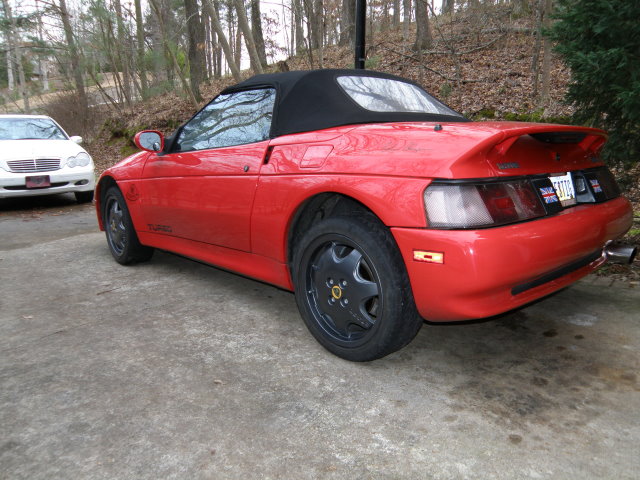
- gun metal wheels 2.jpg (105.09 KiB) Viewed 7338 times
Re: Nigel (soon to be The Stig)
Posted:
Mon 09.02.2009, 00:29by Monty
nChris,
Those wheels look far better than before
