
I think its hit or miss for part's prices overall. I've seen relatively rare parts go for a song and common ones being priced as though they were the last of their kind on the planet - and everything in between. As with most things, supply and demand will usually dictate a range of prices that's acceptable but in the end you have to decide if you're willing to spend the money. Some vendors out there have a good idea of what they are worth and others have no clue (leading to outrageous prices or ridiculously low ones). DVB seems to usually be a bit on the high side of what we'd "like" to pay for parts but they do seem to move a fair amount of stuff at the prices they ask.
The bottom line is that if you need/want the part badly enough I suppose you'll pay the vendor what they want.
| Home | WikiLEC | Repairs | Upgrades | Gallery | Buy & Sell | Mountain Chips | Meets & Events | Contact |
|
Small (or maybe not) project. 91 elan
Moderators: theelanman, dapinky, Specky, clemo, Nige, Sy V, Dave Eds, DaveT, Elanlover, muley, Enright, algirdas, nitroman, GeoffSmith
Re: Small (or maybe not) project. 91 elan
 by Elanlover » Sat 27.12.2014, 15:02
I do whatever my Rice Crispies tell me to do
-
Elanlover - Moderator
- Posts: 3513
- Joined: Fri 05.08.2005, 19:11
- Location: The Great White North
Small (or maybe not) project. 91 elan
by Tuga2112 » Wed 21.01.2015, 00:48
So, its been a while since the last update again.
although its not visible in the post i was in contact with ElanLover Via PM's refering he's pretty cool interior makeover.
So before the bunch of pictures about the small addition to the project, a resume of future plans, as usual feel free to leave your suggestions.
Fascia panel mod.
Following ElanLover example i plan to make a 2 din fascia panel, so far i have a spare fascia panel that i got from another LEC member for a very reasonable price, (it's damaged but for what im going to do that is perfect)
I went to the local scrapyard and looked around for a donor fascia for the buttons, 2 din socket and possibly vents.
I have settled for a 51 Mondeo fascia, i liked the buttons shape, they look modern enough to make me believe they will be an improvement, however they don't look too new to be obviously aftermarket to most people, going to pick that up this weekend.
then its a matter or figuring out the layout and starting playing around with fibre glass and grinder.
Third brake Light mod.
Also inspired by elanLover's post, I got a spare spoiler from the same guy that got me the fascia.
got some LED strip lights traveling around the world to my workplace at the moment,a "Big Boy" glass fibre repair kit is already here and a chrome paint spray can is also on the way.
once all this parts arrive the plan is to make a cut in the middle of the spoiler, paint it chrome to make it reflect more light, fit in 2 LED strips one on the top and one of the bottom of the cut, then cut a ridge all through the spoiler to run the wires and fill it up again with fibreglass. put a connector on the area where the spoiler screws on the boot lid, and another connector on the boot lid to car area.
the only thing i haven't figured out yet about this mod is how to cover the spoiler rear with some glass or acrylic, I don't know how to work acrylic and haven't seen any suitable glass for the task, suggestions are welcome
Key mod.
when i first bough the car and the keys were handed to my hand i was VERY DISAPOINTED with the looks of the keys.... so i decided to do something about it.
These are the items i got from ebay.
generic car key and Lotus pin badge from a ebay seller called unofficiallyoriginal Unfortunately by the time i am posting this the seller seems to be away with the ebay store closed. so i did a bit of detective work and found him on a different website, contacted him and seems like he now has a second store on that same website which is the one linked.
then you need a drill with a conical grind stone, and a normal drill bit, BUT if you have something to make large-ish holes go for it, it will save you a lot of time.
you will also need a dremel in order to make the "right" cuts in the spare key to swap the blades. (second part of the project not yet done)
First attempt, i just drilled a small hole a put the badge on top, here's what it looked like.


Then i realized i had to put more effort if i wanted something that looked less clumsy, so i enlarged the hole and here is the result, with the badge in 2 different angles.


Final comparison with he original key, in my opinion the new key looks a lot more recent than the outdated original.

currently the badge is in place by filling up the inside of the key with blu tack, the plan is maybe to put some hot glue, but i am looking into the idea of putting an LED on the front of the key and switching it on by pressing the badge, a bit of research is required but its a likely improvement for the key to look more 21st century
the next step is to get a copy of the car keys from timpsons, then i will have to prize of the plastic of the blade and cut the blade in shape so i can swap it with the one that the Ebay key came with.
EDIT
got a copy from local locksmith, and it doesn't work, tomorrow going back to the locksmith to see what they can do.
adding up the costs this key is around £10-£12 if you gather everything and do it yourself.
Resume of costs:
duplicate key £6.50
base key from ebay (where you get the bow from) £1
A pin badge £2.50 (you will probably need to pay postage on top of that, i know mine was £5.00 )
around 1- 2 hours work enlarging the hole in the Bow for the pin (took me 2 hours but i was being very slow due to not having the best tools for the job)
you will also need something (blu tack or hot glue) to make sure the badge doesnt move about, it all depends if you want to turn the pin into a button or not.
although its not visible in the post i was in contact with ElanLover Via PM's refering he's pretty cool interior makeover.
So before the bunch of pictures about the small addition to the project, a resume of future plans, as usual feel free to leave your suggestions.
Fascia panel mod.
Following ElanLover example i plan to make a 2 din fascia panel, so far i have a spare fascia panel that i got from another LEC member for a very reasonable price, (it's damaged but for what im going to do that is perfect)
I went to the local scrapyard and looked around for a donor fascia for the buttons, 2 din socket and possibly vents.
I have settled for a 51 Mondeo fascia, i liked the buttons shape, they look modern enough to make me believe they will be an improvement, however they don't look too new to be obviously aftermarket to most people, going to pick that up this weekend.
then its a matter or figuring out the layout and starting playing around with fibre glass and grinder.
Third brake Light mod.
Also inspired by elanLover's post, I got a spare spoiler from the same guy that got me the fascia.
got some LED strip lights traveling around the world to my workplace at the moment,a "Big Boy" glass fibre repair kit is already here and a chrome paint spray can is also on the way.
once all this parts arrive the plan is to make a cut in the middle of the spoiler, paint it chrome to make it reflect more light, fit in 2 LED strips one on the top and one of the bottom of the cut, then cut a ridge all through the spoiler to run the wires and fill it up again with fibreglass. put a connector on the area where the spoiler screws on the boot lid, and another connector on the boot lid to car area.
the only thing i haven't figured out yet about this mod is how to cover the spoiler rear with some glass or acrylic, I don't know how to work acrylic and haven't seen any suitable glass for the task, suggestions are welcome
Key mod.
when i first bough the car and the keys were handed to my hand i was VERY DISAPOINTED with the looks of the keys.... so i decided to do something about it.
These are the items i got from ebay.
generic car key and Lotus pin badge from a ebay seller called unofficiallyoriginal Unfortunately by the time i am posting this the seller seems to be away with the ebay store closed. so i did a bit of detective work and found him on a different website, contacted him and seems like he now has a second store on that same website which is the one linked.
then you need a drill with a conical grind stone, and a normal drill bit, BUT if you have something to make large-ish holes go for it, it will save you a lot of time.
you will also need a dremel in order to make the "right" cuts in the spare key to swap the blades. (second part of the project not yet done)
First attempt, i just drilled a small hole a put the badge on top, here's what it looked like.
Then i realized i had to put more effort if i wanted something that looked less clumsy, so i enlarged the hole and here is the result, with the badge in 2 different angles.
Final comparison with he original key, in my opinion the new key looks a lot more recent than the outdated original.
currently the badge is in place by filling up the inside of the key with blu tack, the plan is maybe to put some hot glue, but i am looking into the idea of putting an LED on the front of the key and switching it on by pressing the badge, a bit of research is required but its a likely improvement for the key to look more 21st century
the next step is to get a copy of the car keys from timpsons, then i will have to prize of the plastic of the blade and cut the blade in shape so i can swap it with the one that the Ebay key came with.
EDIT
got a copy from local locksmith, and it doesn't work, tomorrow going back to the locksmith to see what they can do.
adding up the costs this key is around £10-£12 if you gather everything and do it yourself.
Resume of costs:
duplicate key £6.50
base key from ebay (where you get the bow from) £1
A pin badge £2.50 (you will probably need to pay postage on top of that, i know mine was £5.00 )
around 1- 2 hours work enlarging the hole in the Bow for the pin (took me 2 hours but i was being very slow due to not having the best tools for the job)
you will also need something (blu tack or hot glue) to make sure the badge doesnt move about, it all depends if you want to turn the pin into a button or not.
Last edited by Tuga2112 on Sat 08.12.2018, 00:38, edited 1 time in total.
Still learning
Youtube Channel @Tuga2112 M100 repair videos
Youtube Channel @Tuga2112 M100 repair videos
-

Tuga2112 - God
- Posts: 3057
- Joined: Fri 12.09.2014, 22:54
- Location: Durham with a regular trip to Walsall
Re: Small (or maybe not) project. 91 elan
by Tuga2112 » Sat 24.01.2015, 00:27
3rd brake light update.
got the base hole made in the spoiler now, and the light fits in.
I have found the spoiler to be composed of hard epoxy layer of about 2-3 milimeters and the centre seems to be some kind of foam. an unexpected material, im not sure if glass fibre is meant to have that consistency. but judging on how easily i could pierce through the foamy substance, i am going to try a different approach to get wires through the inside of the spoiler.
here's a couple of pictures of the progress so far.


the LED strip looks pretty 21st century (or 80's if you consider the knight rider looked similar lol) when its simply pointing out, so instead of having 2 pointing inwards im going to use a single one witht he LEd's pointing outwards.
my idea to get the wires through the inside of the spoiler is to use a very strong magnet and a metal ball with a thread attached to it.
so the ball goes inside the spoiler with the thread and then i hope to be able to guide the metal ball using the magnet on the outside tohards the intended exit point of the wires, when the ball is out, attach the eletrical wires to the thread and pull back.
if this approach works it will minimize the use of epoxy/resin/fibreglass to the bare minimum making it more likely for me to end up with decent spoiler bodywork.
I still need to think of a way to get acrylic or glass to cover the LED strip. preferably in a way that isn't permanent so i can change the strip in the event of breaking.
If you guys got any suggestions on how to DIY a cover for the LED strip let me know.
got the base hole made in the spoiler now, and the light fits in.
I have found the spoiler to be composed of hard epoxy layer of about 2-3 milimeters and the centre seems to be some kind of foam. an unexpected material, im not sure if glass fibre is meant to have that consistency. but judging on how easily i could pierce through the foamy substance, i am going to try a different approach to get wires through the inside of the spoiler.
here's a couple of pictures of the progress so far.
the LED strip looks pretty 21st century (or 80's if you consider the knight rider looked similar lol) when its simply pointing out, so instead of having 2 pointing inwards im going to use a single one witht he LEd's pointing outwards.
my idea to get the wires through the inside of the spoiler is to use a very strong magnet and a metal ball with a thread attached to it.
so the ball goes inside the spoiler with the thread and then i hope to be able to guide the metal ball using the magnet on the outside tohards the intended exit point of the wires, when the ball is out, attach the eletrical wires to the thread and pull back.
if this approach works it will minimize the use of epoxy/resin/fibreglass to the bare minimum making it more likely for me to end up with decent spoiler bodywork.
I still need to think of a way to get acrylic or glass to cover the LED strip. preferably in a way that isn't permanent so i can change the strip in the event of breaking.
If you guys got any suggestions on how to DIY a cover for the LED strip let me know.
Still learning
Youtube Channel @Tuga2112 M100 repair videos
Youtube Channel @Tuga2112 M100 repair videos
-
Tuga2112 - God
- Posts: 3057
- Joined: Fri 12.09.2014, 22:54
- Location: Durham with a regular trip to Walsall
Re: Small (or maybe not) project. 91 elan
by Elanlover » Sat 24.01.2015, 13:45
Find a plastic supplier and have a piece of acrylic or polycarbonate cut to the approximate size and shape it yourself. It should be reasonably thick 4.5mm or more).
I do whatever my Rice Crispies tell me to do
-
Elanlover - Moderator
- Posts: 3513
- Joined: Fri 05.08.2005, 19:11
- Location: The Great White North
Re: Small (or maybe not) project. 91 elan
by chrisP » Fri 30.01.2015, 18:20
-
chrisP - Fanatic
- Posts: 639
- Joined: Fri 13.06.2003, 12:28
- Location: Hertfordshire
Re: Small (or maybe not) project. 91 elan
by Tuga2112 » Fri 30.01.2015, 18:37
chrisP wrote:I am installing one of these in my spoiler:
http://www.ebay.com/itm/220962435335
it is fully enclosed
Is it thin enough for our spoilers? I measured little more than 1cm thinkness available. Which worked fine for the led strip.
Still learning
Youtube Channel @Tuga2112 M100 repair videos
Youtube Channel @Tuga2112 M100 repair videos
-
Tuga2112 - God
- Posts: 3057
- Joined: Fri 12.09.2014, 22:54
- Location: Durham with a regular trip to Walsall
Re: Small (or maybe not) project. 91 elan
by chrisP » Mon 02.02.2015, 13:15
Yes the one I have (which i cannot find on ebay anymore) Which looks identical to the one in the link is 1cm thick. It is not an easy job though. I had to get a really long drill bit to create the hole for the wire to go through.
-
chrisP - Fanatic
- Posts: 639
- Joined: Fri 13.06.2003, 12:28
- Location: Hertfordshire
Re: Small (or maybe not) project. 91 elan
by Tuga2112 » Sun 08.02.2015, 18:59
Elanlover wrote:Find a plastic supplier and have a piece of acrylic or polycarbonate cut to the approximate size and shape it yourself. It should be reasonably thick 4.5mm or more).
following your suggestion got 3mm thick translucent red acrylic. after the required time with the dremel its in shape and fits nicely, the only issue is that the "red" is rather light and pretty much orange.
im now waiting for some bullet connectors to get delivered so i can connect them with the LEDs and the wires going inside the spoiler, then fit the acrylic piece and take a couple of pics, i think next weekend ill be painting the spoiler mustard yellow and it should be fitted
Still learning
Youtube Channel @Tuga2112 M100 repair videos
Youtube Channel @Tuga2112 M100 repair videos
-
Tuga2112 - God
- Posts: 3057
- Joined: Fri 12.09.2014, 22:54
- Location: Durham with a regular trip to Walsall
Re: Small (or maybe not) project. 91 elan
by Elanlover » Sun 08.02.2015, 19:54
Tuga2112 wrote:Elanlover wrote:Find a plastic supplier and have a piece of acrylic or polycarbonate cut to the approximate size and shape it yourself. It should be reasonably thick 4.5mm or more).
following your suggestion got 3mm thick translucent red acrylic. after the required time with the dremel its in shape and fits nicely, the only issue is that the "red" is rather light and pretty much orange.
im now waiting for some bullet connectors to get delivered so i can connect them with the LEDs and the wires going inside the spoiler, then fit the acrylic piece and take a couple of pics, i think next weekend ill be painting the spoiler mustard yellow and it should be fitted
What colour LED's did you use? LED's are not at all like typical incandescent lighting when it comes to diffuser and/or lens colour. With LED's you need red behind a red lens (or clear lens). White LED's behind a red lens will make look pinkish.
I do whatever my Rice Crispies tell me to do
-
Elanlover - Moderator
- Posts: 3513
- Joined: Fri 05.08.2005, 19:11
- Location: The Great White North
Re: Small (or maybe not) project. 91 elan
by Tuga2112 » Sun 08.02.2015, 20:13
Elanlover wrote:Tuga2112 wrote:Elanlover wrote:Find a plastic supplier and have a piece of acrylic or polycarbonate cut to the approximate size and shape it yourself. It should be reasonably thick 4.5mm or more).
following your suggestion got 3mm thick translucent red acrylic. after the required time with the dremel its in shape and fits nicely, the only issue is that the "red" is rather light and pretty much orange.
im now waiting for some bullet connectors to get delivered so i can connect them with the LEDs and the wires going inside the spoiler, then fit the acrylic piece and take a couple of pics, i think next weekend ill be painting the spoiler mustard yellow and it should be fitted
What colour LED's did you use? LED's are not at all like typical incandescent lighting when it comes to diffuser and/or lens colour. With LED's you need red behind a red lens (or clear lens). White LED's behind a red lens will make look pinkish.
Got them red.
Still learning
Youtube Channel @Tuga2112 M100 repair videos
Youtube Channel @Tuga2112 M100 repair videos
-
Tuga2112 - God
- Posts: 3057
- Joined: Fri 12.09.2014, 22:54
- Location: Durham with a regular trip to Walsall
Re: Small (or maybe not) project. 91 elan
by Tuga2112 » Sat 21.02.2015, 23:29
Another update on the break light mod.
i used the Dremel to cut a ridge from the middle of the spoiler to the side, and a drill to make a single hole from the area where i want the wire to come out.
then used some metal wires to push across the electric wire as the pictures suggest.
LED strip

wire trick1

wire trick 2

Filled all back with resin no fibreglass sheets needed because the ridge was very thin, in fact it was virtually impossible to refill the ridge with fibre glass sheets.
then i sanded down the excess, and sanded the whole spoiler in preparation to paint.
First attempt at painting went VERY wrong. i had paint running all over the place, so today i spend the morning sanding the spoiler again and the afternoon repainting it, this time using extremely thin layers of paint, and a lot of them.
Then i fitted the LEDs and acrylic and wire things up just to take some pics to show.


Following the suggestion from the other Midlanders, this time the spoiler is drying at home, so its a bit warmer.
For those who are curious (i like me and always consider costs for everything) I think the total cost of the spoiler was around 80 quid, this includes
paint (300ml of paint plus thinner and hardener)
wire (around 2 meters)
fiberglass repair kit
A spare spoiler
red LED light strip (from ebay, very good price)
electric connectors
acrylic sheet
obviously this is the cost of materials only.
and just to finish the post with a punch line. apart from loving to see elanLover's post, i read this article, which was an extra incentive to go forward and do this mod.
www.carwrecks.com/whats-new/rear-end-collision-research-continues
according to wikipedia, the original 60% less likelihook of a collision has lowered to 4% as time gone by because nowadays all cars have a third brake light.
i used the Dremel to cut a ridge from the middle of the spoiler to the side, and a drill to make a single hole from the area where i want the wire to come out.
then used some metal wires to push across the electric wire as the pictures suggest.
LED strip
wire trick1
wire trick 2
Filled all back with resin no fibreglass sheets needed because the ridge was very thin, in fact it was virtually impossible to refill the ridge with fibre glass sheets.
then i sanded down the excess, and sanded the whole spoiler in preparation to paint.
First attempt at painting went VERY wrong. i had paint running all over the place, so today i spend the morning sanding the spoiler again and the afternoon repainting it, this time using extremely thin layers of paint, and a lot of them.
Then i fitted the LEDs and acrylic and wire things up just to take some pics to show.
Following the suggestion from the other Midlanders, this time the spoiler is drying at home, so its a bit warmer.
For those who are curious (i like me and always consider costs for everything) I think the total cost of the spoiler was around 80 quid, this includes
paint (300ml of paint plus thinner and hardener)
wire (around 2 meters)
fiberglass repair kit
A spare spoiler
red LED light strip (from ebay, very good price)
electric connectors
acrylic sheet
obviously this is the cost of materials only.
and just to finish the post with a punch line. apart from loving to see elanLover's post, i read this article, which was an extra incentive to go forward and do this mod.
www.carwrecks.com/whats-new/rear-end-collision-research-continues
according to wikipedia, the original 60% less likelihook of a collision has lowered to 4% as time gone by because nowadays all cars have a third brake light.
Still learning
Youtube Channel @Tuga2112 M100 repair videos
Youtube Channel @Tuga2112 M100 repair videos
-
Tuga2112 - God
- Posts: 3057
- Joined: Fri 12.09.2014, 22:54
- Location: Durham with a regular trip to Walsall
Re: Small (or maybe not) project. 91 elan
by Tuga2112 » Mon 23.02.2015, 20:38
just to add to the spam thread.
spoiler fitted, and a few pictures of it.
let me know what you think.
you cant see from the pictures but there are some very obvious inperfections in the acrylic, that will be another day or 2 job to make another sheet with the correct look.
I'm thinking of possibly scraping the acrilyc so it spells M100 when the light is on. (like in this video) Does anyone know the font used to make the rear plates ("Lotus" and "Elan SE") of our cars ?
The next task is to buy fibreglass and resin and a lot of research in order to tackle the dashboard


EDIT:
for some reason a bb marley ytshirt appeared instead of the picture, getting the right picture there.
spoiler fitted, and a few pictures of it.
let me know what you think.
you cant see from the pictures but there are some very obvious inperfections in the acrylic, that will be another day or 2 job to make another sheet with the correct look.
I'm thinking of possibly scraping the acrilyc so it spells M100 when the light is on. (like in this video) Does anyone know the font used to make the rear plates ("Lotus" and "Elan SE") of our cars ?
The next task is to buy fibreglass and resin and a lot of research in order to tackle the dashboard
EDIT:
for some reason a bb marley ytshirt appeared instead of the picture, getting the right picture there.
Last edited by Tuga2112 on Sun 17.05.2015, 11:48, edited 2 times in total.
Still learning
Youtube Channel @Tuga2112 M100 repair videos
Youtube Channel @Tuga2112 M100 repair videos
-
Tuga2112 - God
- Posts: 3057
- Joined: Fri 12.09.2014, 22:54
- Location: Durham with a regular trip to Walsall
Re: Small (or maybe not) project. 91 elan
by Tuga2112 » Sun 22.03.2015, 22:15
MOT Due in soon and some concerns.
The MOT is due in early April, I have little clue what can go wrong. but from the diving i done recently i have some fear about brakes.
I am assuming the normal foot brakes will pass the MOT because when i press hard enough the front wheels lock. and i never noticed the car trying to steer to one side when braking hard either.
My friend who is a mechanic told me a practical test is to try to stop from 60 to 0 in less than 60 meters. I will need to find a suitable road for such test but i feel confident about it.
The second fear is the handbrake. now this is the one that worries me because the handbrake seems to do little effect in most of its movement, but if pushed hard up it does brake firmly.
does anyone know a practical way to test it and be confident it will pass the MOT?
On the topic of the project as a whole,
I have decided that this post is going all over the place as the project keeps getting things added and others delayed as my mood swings, so i will be editing the first page to make it a bit more helpfull for anyone new coming across the post. by adding all the bits that were done but never planned, and reminding myself of the bits planned that i have forgotten by now.
And as an update on the previous posts.
3rd Brake light
the work is not completed yet, however i have an acrylic of the right colour in place and all wired up. the only missing bits is to shorten the cable and fix it in the inside of the car in a more robust way than old blu tack.
so far i though of either new blu tack or small self tapping screws with plastic hooks. any suggestions guys ?
Lotus branded Key
still in the same state as before, I havent had the patience to research about how to make the LED flashlight work, this will probably be completed at some later stage.
2Din Fascia panel modification
I have finally bought the resin and fibreglass to start things up, but the dials i have from a Modeo as eletronic which is not ideal, i intend to take off the fascia panel first to investigate the system with my own eyes before making anything for real.
Hood seals
this was the first thing i wanted to repair in the car, but seeing a full set of seals from SJ sportscars at £400 I have postponed it for a while, in the meanwhile contacted Jamie N about he's thread And he is helping me out with the project with some pre constructed 207 seals to get mine replaced. With He's help this task should go smoothly, I will post pictures on it and with a bit of luck contribute to he's thread with some hands on experience or tips.
The promised "next year will paint it again... properly" part
As i expected my first attempt to paint was not up to the standards i would like it to be, also when i got some more paint from the same shop they gave me a darker shade of yellow, at the moment if you look closely to my car you can notice 2 tones of yellow, one being rather bright and the other being the correct NMY color.
Also i am seeing a couple of places where the paint peeled off, and... by my mistake i made a massive scratch in the bonnet with my toolbox. so all in all i will be back on the sandpaper business soon. hopefully this time with my knowledge from previous experience and less rusty bolts i should be able to complete the job with better quality and in a record time.
Front rubber skirt
I went underneath the car to check for the exhaust (currently with gum gum) and came across a few missing bits holding together the rubber skirts.
if anyone can tell me the name of these special looking screws it would be most appreciated as i need to replace the rusty ones and put some in the middle area where they are missing..


The MOT is due in early April, I have little clue what can go wrong. but from the diving i done recently i have some fear about brakes.
I am assuming the normal foot brakes will pass the MOT because when i press hard enough the front wheels lock. and i never noticed the car trying to steer to one side when braking hard either.
My friend who is a mechanic told me a practical test is to try to stop from 60 to 0 in less than 60 meters. I will need to find a suitable road for such test but i feel confident about it.
The second fear is the handbrake. now this is the one that worries me because the handbrake seems to do little effect in most of its movement, but if pushed hard up it does brake firmly.
does anyone know a practical way to test it and be confident it will pass the MOT?
On the topic of the project as a whole,
I have decided that this post is going all over the place as the project keeps getting things added and others delayed as my mood swings, so i will be editing the first page to make it a bit more helpfull for anyone new coming across the post. by adding all the bits that were done but never planned, and reminding myself of the bits planned that i have forgotten by now.
And as an update on the previous posts.
3rd Brake light
the work is not completed yet, however i have an acrylic of the right colour in place and all wired up. the only missing bits is to shorten the cable and fix it in the inside of the car in a more robust way than old blu tack.
so far i though of either new blu tack or small self tapping screws with plastic hooks. any suggestions guys ?
Lotus branded Key
still in the same state as before, I havent had the patience to research about how to make the LED flashlight work, this will probably be completed at some later stage.
2Din Fascia panel modification
I have finally bought the resin and fibreglass to start things up, but the dials i have from a Modeo as eletronic which is not ideal, i intend to take off the fascia panel first to investigate the system with my own eyes before making anything for real.
Hood seals
this was the first thing i wanted to repair in the car, but seeing a full set of seals from SJ sportscars at £400 I have postponed it for a while, in the meanwhile contacted Jamie N about he's thread And he is helping me out with the project with some pre constructed 207 seals to get mine replaced. With He's help this task should go smoothly, I will post pictures on it and with a bit of luck contribute to he's thread with some hands on experience or tips.
The promised "next year will paint it again... properly" part
As i expected my first attempt to paint was not up to the standards i would like it to be, also when i got some more paint from the same shop they gave me a darker shade of yellow, at the moment if you look closely to my car you can notice 2 tones of yellow, one being rather bright and the other being the correct NMY color.
Also i am seeing a couple of places where the paint peeled off, and... by my mistake i made a massive scratch in the bonnet with my toolbox. so all in all i will be back on the sandpaper business soon. hopefully this time with my knowledge from previous experience and less rusty bolts i should be able to complete the job with better quality and in a record time.
Front rubber skirt
I went underneath the car to check for the exhaust (currently with gum gum) and came across a few missing bits holding together the rubber skirts.
if anyone can tell me the name of these special looking screws it would be most appreciated as i need to replace the rusty ones and put some in the middle area where they are missing..
Still learning
Youtube Channel @Tuga2112 M100 repair videos
Youtube Channel @Tuga2112 M100 repair videos
-
Tuga2112 - God
- Posts: 3057
- Joined: Fri 12.09.2014, 22:54
- Location: Durham with a regular trip to Walsall
Re: Small (or maybe not) project. 91 elan
by maz_r » Mon 23.03.2015, 00:43
Hiya,
Re. front rubber lip.
According to the parts manual:
A075W5041Z Screw, No.10 x 3/4", spoiler to bumper
A082W4133F Washer, M6 x 15, spoiler to bumper
Which I read as "they are nothing special - just a screw and washer rusted together"
Re. front rubber lip.
According to the parts manual:
A075W5041Z Screw, No.10 x 3/4", spoiler to bumper
A082W4133F Washer, M6 x 15, spoiler to bumper
Which I read as "they are nothing special - just a screw and washer rusted together"
There are 10 kinds of people in the world; those that understand binary.....
-

maz_r - Binary Bodger
- Posts: 741
- Joined: Sun 05.07.2009, 20:36
- Location: Solihull, West Midlands
Re: Small (or maybe not) project. 91 elan
by GeoffSmith » Mon 23.03.2015, 00:50
Correct, but go for stainless! You probably need the #8 spire nuts as well.
Calypso Red S2 #417
USB ElanScan interfaces - £60 incl. UK P&P & £65 incl. ROW P&P
USB ElanScan interfaces - £60 incl. UK P&P & £65 incl. ROW P&P
-

GeoffSmith - Kitty Fiddler
- Posts: 15628
- Joined: Fri 03.02.2006, 21:57
- Location: S2#417 in Tytherington, Gloucestershire
Re: Small (or maybe not) project. 91 elan
by Tuga2112 » Mon 23.03.2015, 09:36
what is the part on the other side that has the 2 metal bits on the edge of the plastic ?
I will be removing the bumper to repaint so i can replace with normal stainless bolts, but i suspect that little metal piece is not a straight forward nut/bolt/washer and without it the only way to remove the rubber is to take the bumper out to be able to get access to the upper area.
I will be removing the bumper to repaint so i can replace with normal stainless bolts, but i suspect that little metal piece is not a straight forward nut/bolt/washer and without it the only way to remove the rubber is to take the bumper out to be able to get access to the upper area.
Still learning
Youtube Channel @Tuga2112 M100 repair videos
Youtube Channel @Tuga2112 M100 repair videos
-
Tuga2112 - God
- Posts: 3057
- Joined: Fri 12.09.2014, 22:54
- Location: Durham with a regular trip to Walsall
Re: Small (or maybe not) project. 91 elan
by maz_r » Mon 23.03.2015, 09:51
Do you mean these?
They are called spire nuts, like what Geoff said, and slide over the edge of the bumper. Or do you meant something else and I've misunderstood?
- image.jpg (10.91 KiB) Viewed 424640 times
They are called spire nuts, like what Geoff said, and slide over the edge of the bumper. Or do you meant something else and I've misunderstood?
There are 10 kinds of people in the world; those that understand binary.....
-
maz_r - Binary Bodger
- Posts: 741
- Joined: Sun 05.07.2009, 20:36
- Location: Solihull, West Midlands
Re: Small (or maybe not) project. 91 elan
by Tuga2112 » Mon 23.03.2015, 09:59
maz_r wrote:Do you mean these?
They are called spire nuts, like what Geoff said, and slide over the edge of the bumper. Or do you meant something else and I've misunderstood?
That seems to be what I meant. I'm off to eBaynow to bbuy some of these stainless thanks guys
Still learning
Youtube Channel @Tuga2112 M100 repair videos
Youtube Channel @Tuga2112 M100 repair videos
-
Tuga2112 - God
- Posts: 3057
- Joined: Fri 12.09.2014, 22:54
- Location: Durham with a regular trip to Walsall
Re: Small (or maybe not) project. 91 elan
by Tuga2112 » Sun 29.03.2015, 20:38
and... another call for help
after a "lovely" trip from coventry back to stafford... while crossing birmingham i gone past a nice amount of rain. pouring proper rain
after an enjoyable bend of the roundabout getting out of the M6 the car starting making a weird noise. however it was running just fine mechanically. but i noticed the radio died and pretty much all electrics were not responding apart from the signals.
drove home and just before switching off the ignition the sound stopped and the electrics started working again.
then i flicked the key again and the car started (when i was not supposed to) which the same sound.
My conclusion the starter motor is spinning when its not meant to.
I think after going through that downpour there must have been some water getting in the system, and after the "happy" bend the water got moved around and made a short circuit on the ignition.
I am going to look into the manuals see if i can trace wires around see if theres anyplace wet that its not meant to.
in the meanwhile, if you guys ever experienced same issue (im hopping here for a common fault) let me know.
after a "lovely" trip from coventry back to stafford... while crossing birmingham i gone past a nice amount of rain. pouring proper rain
after an enjoyable bend of the roundabout getting out of the M6 the car starting making a weird noise. however it was running just fine mechanically. but i noticed the radio died and pretty much all electrics were not responding apart from the signals.
drove home and just before switching off the ignition the sound stopped and the electrics started working again.
then i flicked the key again and the car started (when i was not supposed to) which the same sound.
My conclusion the starter motor is spinning when its not meant to.
I think after going through that downpour there must have been some water getting in the system, and after the "happy" bend the water got moved around and made a short circuit on the ignition.
I am going to look into the manuals see if i can trace wires around see if theres anyplace wet that its not meant to.
in the meanwhile, if you guys ever experienced same issue (im hopping here for a common fault) let me know.
Still learning
Youtube Channel @Tuga2112 M100 repair videos
Youtube Channel @Tuga2112 M100 repair videos
-
Tuga2112 - God
- Posts: 3057
- Joined: Fri 12.09.2014, 22:54
- Location: Durham with a regular trip to Walsall
Re: Small (or maybe not) project. 91 elan
by Tuga2112 » Sun 17.05.2015, 13:15
Its been a month and i haven't added to the spam. (because computer broke)
so here's a (not so) small update on the state of the project.
Starter motor issue
turns out this was a short circuit in the piranha (suposed to be disabled) alarm which i bypassed, as some of you know I had issues with this in the past and postponed the removal of the alarm.
At the moment I have improved the bypass to avoid the same issue occurring again removing this alarm is still in the pipeline, in fact i intend to do it when i replace the fascia panel.
MOT test Odyssey
so, took the car to the MOT and it failed with 9 points.
1 - bulb was good, wires just not connected properly.
2 - got theDurite Dipped Beam 042275 as per wiki post and followed it to fit.
3 - easy fix after replacing the lamp
4 and 5 - these were a paint to get to, dust boots are cheap and easy to source, but putting the clips is very difficult, there was also a couple of hiccups when trying to get the lower ball joint free, (this means 2 hours with a ball join splitter and an hammer) and when screwing things together the joints were spinning. I solved that problem following this video from one of my Youtube "mentors".
6 - I had gum gum on it... but wasn't doing the job properly, it was a pain to take the part out to get it welded, in the end i got a exhaust sleeve and simply cut the exhaust in order to take it out. after welding it together putting the exhaust back in place was easy.
7 - was fixed by solving 6. i learn from the mechanic that the emissions reading is high because with a hole in the exhaust the pressure goes lower, the emissions reading tool compensated lower pressures by increasing the reading.
8 - The power steering was working, the mechanic said the steering wasn't as light as it should be, i argued that the elans always have heavy steering as per conversations with other owners and some topics, either way i changed the power steering fluid in the hope to make it better, it improved slightly and it passed the mot. I bought a spare PAS pump which i intend to fit at some point in future, but not the near future.
9- got a spare alloy from another LEC member, my car now looks weird because the original alloys were painted grey/brown by a previous owner, the replacement i got is silver, just need to find the right paint to make it look right
Front rubber skirt
all the rusted out screws have been taken out, i got some stainless spire nuts, the only ones i could find on Ebay where from a land rover, unfortunately they are too large to fit in the bumper, so i went for the alternative and took stainless bolts and nuts to fix it in place, together with some washers just to keep things in place, unfortunately i do not have any stainless washers, although i gave them a coating of petroleum jelly these will probably rust anyway.
Repaint
got all the tools, masking tape, sanding paper, and next week off. im considering taking off the clam shell so i can paint the engine bay yellow as well, i have looked on the forum for clam shell see if i can find any information on how to take it off without any luck. Maybe there is a different name for this part ?
3rd Brake light
An idea came up in order to replace the blu tack with something more permanent
Cable clamps
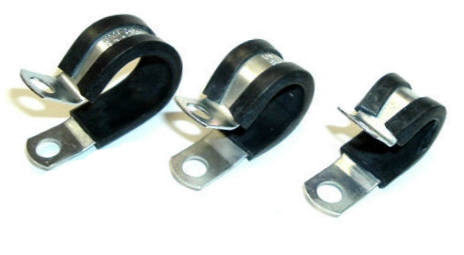
fitted in with rivet nuts should work out fine, and be easily reversible if i ever decide i don't want a 3rd brake light in future.
Parts ordered, should arrive Wednesday, so Thursday i should have another update.
Everything else is in the same state as before. the good news is that the MOT is passed now and the car is working just fine for the summer
so here's a (not so) small update on the state of the project.
Starter motor issue
turns out this was a short circuit in the piranha (suposed to be disabled) alarm which i bypassed, as some of you know I had issues with this in the past and postponed the removal of the alarm.
At the moment I have improved the bypass to avoid the same issue occurring again removing this alarm is still in the pipeline, in fact i intend to do it when i replace the fascia panel.
MOT test Odyssey
so, took the car to the MOT and it failed with 9 points.
- 1 passenger side main beam didnt work
- 2 passenger side dipped beam not bright enough
- 3 passenger side dipped beam aim too low
- 4 Front driver side rubber dust boot in lower ball join damaged and leaking grease
- 5 Front driver side rubber dust boot in steering ball join damaged and leaking grease
- 6 Exhaust Blowout
- 7 emissions way too high (7%)
- 8 Power steering not functioning
- 9 Driver side rear alloy is/was distorted
1 - bulb was good, wires just not connected properly.
2 - got theDurite Dipped Beam 042275 as per wiki post and followed it to fit.
3 - easy fix after replacing the lamp
4 and 5 - these were a paint to get to, dust boots are cheap and easy to source, but putting the clips is very difficult, there was also a couple of hiccups when trying to get the lower ball joint free, (this means 2 hours with a ball join splitter and an hammer) and when screwing things together the joints were spinning. I solved that problem following this video from one of my Youtube "mentors".
6 - I had gum gum on it... but wasn't doing the job properly, it was a pain to take the part out to get it welded, in the end i got a exhaust sleeve and simply cut the exhaust in order to take it out. after welding it together putting the exhaust back in place was easy.
7 - was fixed by solving 6. i learn from the mechanic that the emissions reading is high because with a hole in the exhaust the pressure goes lower, the emissions reading tool compensated lower pressures by increasing the reading.
8 - The power steering was working, the mechanic said the steering wasn't as light as it should be, i argued that the elans always have heavy steering as per conversations with other owners and some topics, either way i changed the power steering fluid in the hope to make it better, it improved slightly and it passed the mot. I bought a spare PAS pump which i intend to fit at some point in future, but not the near future.
9- got a spare alloy from another LEC member, my car now looks weird because the original alloys were painted grey/brown by a previous owner, the replacement i got is silver, just need to find the right paint to make it look right
Front rubber skirt
all the rusted out screws have been taken out, i got some stainless spire nuts, the only ones i could find on Ebay where from a land rover, unfortunately they are too large to fit in the bumper, so i went for the alternative and took stainless bolts and nuts to fix it in place, together with some washers just to keep things in place, unfortunately i do not have any stainless washers, although i gave them a coating of petroleum jelly these will probably rust anyway.
Repaint
got all the tools, masking tape, sanding paper, and next week off. im considering taking off the clam shell so i can paint the engine bay yellow as well, i have looked on the forum for clam shell see if i can find any information on how to take it off without any luck. Maybe there is a different name for this part ?
3rd Brake light
An idea came up in order to replace the blu tack with something more permanent
Cable clamps
fitted in with rivet nuts should work out fine, and be easily reversible if i ever decide i don't want a 3rd brake light in future.
Parts ordered, should arrive Wednesday, so Thursday i should have another update.
Everything else is in the same state as before. the good news is that the MOT is passed now and the car is working just fine for the summer
Still learning
Youtube Channel @Tuga2112 M100 repair videos
Youtube Channel @Tuga2112 M100 repair videos
-
Tuga2112 - God
- Posts: 3057
- Joined: Fri 12.09.2014, 22:54
- Location: Durham with a regular trip to Walsall
Return to Projects - Other (Minor)
Who is online
Users browsing this forum: No registered users and 3 guests